Recording transaction scripts
Recording transaction scripts directly from EasyInput.
In order to start transaction script recording one should select EI_Script_TR worksheet and press the Record script button on EasyInput ribbon menu ![]() .
.
Then, an input box appears. Here one should provide the transaction code to be recorded and select the recording mode. To facilitate the transaction code search one can use the F4 help button. If the transaction should only send data to an SAP system, then Standard mode is recommended. For reading data from SAP, the Extended mode is required. Some transactions can only be recorded in one of the modes (please try another transaction recording mode if the first recording fails).
If both, the transaction code and the connection data on EI_Logon worksheet are correct, then after pressing OK button SAP GUI window with the selected transaction should appear. From that moment on, all the user actions (apart from F4 searches) are recorded. Usually one has to repeat script recording several times to get a script without unnecessary user actions and without errors. The recording ends automatically when the user finishes the transaction. Then the user can decide whether to import such a recording or discard it. When the script is imported to the EI_Script_TR worksheet, then in the first line, apart from transaction code, the script mode identifier is put in the column Field value (B-Standard, C-Extended).
Several rules of script recording:
- to make script universal one has to think carefully how the recorded transaction work (in FB50 transaction where there are line items, it is worth to enter the data always to the first row, and add a new row above the preceding to always perform the same pattern for the data line. This will allow to exceed the limit of ten line items visible on screen, and to treat the script for the first line as the script for all data lines)
- During recording it is advisory to enter a value to all fields to which later EasyInput will provide a value (even if the value as default is already given). This will save us time on manually editing recorded script.
- When EasyInput will be to read a value from a field it is advisory during recording to press Enter on the screen and to set the cursor on that field (click it with the mouse. This will add a new screen in the script (Enter) and record cursor focus line, where the user will later add read reference.
Script row meaning
Although a recorded script contains many rows, and may seem quite complex at the beginning, but the rows can be easily assigned to only a few of row types. The table below makes the script structure more comprehensible
|
Script row |
Meaning |
|
//T/Transaction/ Example: //T/FB50/ |
Informs that the script is recorded for a given transaction. Is placed always at the beginning of a recorded script. One EasyInput script can contain several recorded scripts one after another. |
|
Program/Screen/X// Example: SAPMF05A/1001/X// |
Informs about start of a new screen in the script. Until another screen row (or till the end of the script) all the script rows below are recorded for this screen. |
|
///BDC_OKCODE/Code Example: ///BDC_OKCODE/=0005 |
Defines which key/button/ icon was pressed to go to the next screen (the next screen can be the same screen e.g. after pressing enter). The most common codes =OK or /00 for the Enter key. |
|
///BDC_SUBSCR/subscreen |
Defines subscreens within the main script screen. Usually left without a change in the script. |
|
///BDC_CURSOR /field Example: ///BDC_CURSOR/ ACGL_HEAD-BLDAT |
Designates setting cursor to a screen field (e.g. clicking with mouse on a field). Used for example to read the data from the script. Reading data can be done only for such a line (requires filling reference information in columns K=ReadData & L) |
|
///field /value Example: /// ACGL_HEAD-BLDAT / 31.12.2013 |
Designates entering a value to a screen field. Used to enter fixed values or values from the data sheet to a field (writing from Data sheet requires filling reference information in columns K=WriteData i L) |
Manual script adjustments
Sometimes the recorded screen can be used without any changes, but such a situation is rare. Usually the recorded script requires some manual adjustment.
The most common script adjustments:
a) The script lines, that are not needed in our script can be removed or inactivated via entering „X” in the „E” column of the script worksheet (EI_Script_TR)
b) For script rows of type (///field / value), for which one wants to enter the data from the data sheet adding references in columns K & L is needed. Such lines if not recorded can be introduced to the script manually. To get a screen field name click on it, press F1 and then press the technical information icon. On the bottom of the technical information screen, the Screen Field can be found.
c) For script rows of type (///BDC_CURSOR / field), from which we want to copy data to data sheet adding references in columns K & L is needed. The field id can be checked the same way as described above.
d) Removing from the recorded script unnecessary information about repeatable parts e.g. the part referring the second line of the document (usually for such lines the script should contain a part only for one line, that will be repeated as many times as many data rows for the line there are in the data sheet. Remember about pressing inserting a new line to clear the first row in the recorded script to make place for the second row).
e) Adding additional script version with cancelling transaction before the save, for testing purposes. To be able to test transaction data it is recommended to prepare two script versions – for testing and actual run. Usually the versions can be identical up to last script screen. The most common change consist of setting on the last screen two action variants:
Example of change in the last screen action:
|
Run type |
Program |
Screen |
Start ID |
Field name |
Field value |
|
A - Actual run |
|
|
|
BDC_OKCODE |
=BU |
|
T - Test run |
|
|
|
BDC_OKCODE |
/ECNC |
Adding at the end of the script the lines confirming the exit in the test run:
|
Run type |
Program |
Screen |
Start ID |
Field name |
Field value |
|
T - Test run |
SAPLSPO1 |
0200 |
X |
|
|
|
T - Test run |
|
|
|
BDC_OKCODE |
=YES |
Important! For many transactions one can do the change manually basing on the example above. It is however always advisory to record transaction twice, once with a break before saving and then compare the scripts to detect the changes needed.
Important! When recording a transaction containing several line items it is recommended to:
- Always insert new line before the first row (for each script line item)
- Always enter the data into the first row
- Record only the first line item (if while recording more were recorded, they should be removed from the script)
If these rules are followed the script will be ready to be repeated for any number of line item rows in the data sheet (the repeated script rows should be assigned Level value > 0 - see the description of the Level column of the script)
Recording transaction scripts can be done alternatively in the SAP system with the use of transaction SHDB Transaction Recorder). The Transaction recorder records user actions in a given transaction in the form of a script. Such a recorded script may be than copied to the EasyInput EI_Script_TR worksheet.
Recording script with SHDB
The easiest way to start the SHDB transaction is to enter SHDB into the command field in SAP GUI and then press Enter

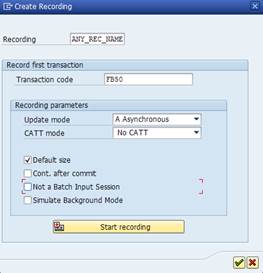
On the main SHDB transaction screen the option to start new recording should be chosen ![]() on the right data should be put in the popup windows that appears afterwards:
on the right data should be put in the popup windows that appears afterwards:

The most important data to be set here are:
- Recorded transaction ID (in the case above FB50)
- The name under which the script will be saved (ANY_REC_NAME).
Important! When the recording is prepared for the standard mode (Batch Input) the Recording parameters should be left with their default values (as on the picture above). If the recording is done for the Extended mode then three Recording parameters should be changed:
- CATT mode should be set to N – CATT without individual screen control
- Cont. after commit – should be checked
- Not a Batch Input Session – should be checked
The next step is to start recording. The screen of the chosen to be recorded transaction should appear. From this moment on all user actions will be recorded. Usually one has to repeat script recording several times to get a script without unnecessary user actions and without errors.
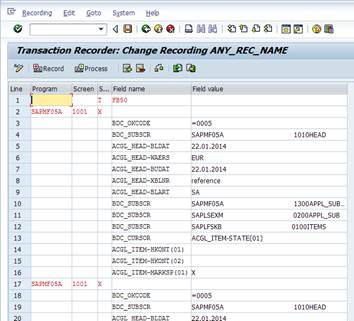
After end of the recorded transaction the SAP system will show the script window.

Script contains script rows grouped for screens. Such a script if correct can be saved and copied to EasyInput Workbook. It can be done either manually or via a text file.
Manual script copying
Use the key sequence
Ctrl + Y = switches SAP to mark area mode
Than the user should mark the area from the first program field to the last field value field visible on the screen.
Ctrl + C = copying the marked selection to the clipboard
After switching to MS Excel, the clipboard can be pasted into the script (EI_Script_TR) columns F-J with the use of Ctrl + V or via ribbon menu.
When copying manually, the copying should be repeated several times, because only data visible on a screen can be copied at once.
Automatic script copying
Firstly save the script to file by clicking Export icon ![]() (Shift + F8) on script change screen in SAP GUI.
(Shift + F8) on script change screen in SAP GUI.
Then, on the EasyInput workbook, on the EI_Script_TR worksheet press the EasyInput ribbon menu button Import script file.
Important: In order to make the button Import script file accessible one should enable it in EasyInput settings: EasyInput Info > Settings > Other via deselecting the Hide advanced script configuration options.